Friday, March 23, 2012

The Green Room

There is an enclosed porch off our kitchen, and when we first moved into our house we kept it closed off from the rest of the house. It was the middle of winter, so it was very cold in there and it became known as "the cold room." There is another small, kind of triangular room off of the porch, which became known as "the weird cold room" due to its irregular shape. 


Of course, as winter turned to spring, and spring turned to summer, the rooms got hotter and hotter. But still, they were the cold rooms. They are both oddly shaped, small, and windowed on all four walls, so we weren't exactly sure what to do with them. We tried using the main room as a mudroom, but that didn't work, because we always use the front door, and you enter this porch through the back door. I tried to use it as my sewing area, but that didn't work, because the space was too awkward to use efficiently and always full of the random items kids tend to drop near entrances and exits. 

So, it sat. And as any unused room will, it slowly became a junk room. I took pictures of it before I put everything away, but I lost them somehow. So you only get to see the clean befores. Which is probably really for the best. But take my word for it: it was bad. 

Something had to be done. I sorted and cleaned and organized and donated. And the room looked better. But still, it wasn't inviting. And I knew it would fill up again, because that is the nature of unused rooms.


So I took the initiative, and filled it with plants. 


And painted it green. I used Ellen Kennon's Peridot, which is absolutely luscious.
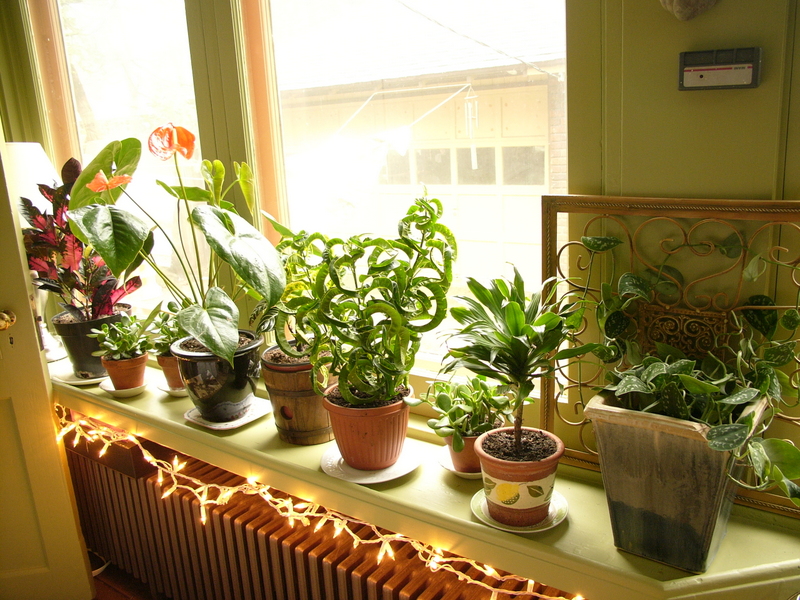

I also finally, finally finished the craft area I planned to set up for the girls for Christmas (but it's tiny, and really hard to photograph).


So now we can sit back there while they sit back there, which means they will sit back there more often. I can see our entire backyard from there too, so no more hot afternoons spent sitting in a plastic chair baking in the sun while the girls play outside.

One day I may even do something about that floor.

Ellen Kennon also wrote about my porch on her blog. She talks about the reasons for going green in rooms like this, and a little about how we chose the color. People are sometimes surprised to learn that I use a color consultant, and think it means she just tells me what color to paint everything! Maybe some are like that, but Ellen is great about considering what I like, and often gives open ended advice. In this case, she said to pick any green from her Nature's Palette. I loved the idea of green, and there were a lot to choose from. I think any of them would have been beautiful in this room, so I just picked my favorite one!

I did a Flickr set with all the befores and afters if you'd like to check them out here: Porch

Thursday, March 15, 2012

Forbidden Fruit

There is something so magical about the Waldorf ideal. Open ended toys made from natural materials, rhythms and routines, delayed academics, wholesome foods, and children who are never exposed to electronic entertainment. It's charming, and timeless, and almost nothing like what goes on in our house.

Oh yes, we've got wooden toys, we rotate books and aren't doing much academic work with my 6.5 year old. We eat well, mostly. I did stock up in Annie's gluten free mac and cheese at Target last week though. Did I mention the girls were there with me? Well, not with me, exactly, they were with Brad. In the toy aisle.

I can say we don't do television at all (actually, that's not entirely true; Lissie has watched Rudolph the Red Nosed Reindeer. Twice.), but I must admit to occasionally letting the girls play a game on my phone or on the iPad. But that's okay, right? Because they are always educational. Oops. So much for delayed academics!

And we try, we try so hard to keep licensed characters out of the house. So how is it that my two year old knows the names of every single Disney Princess?

And Dora.


How do we own a Dora coloring book?

But at least she was coloring in it with beeswax block crayons. That must count for something, right?

Thursday, March 1, 2012

Terrarium Time

Update: My Polka Dot plants were dead within days and the stench was unbearable, so we dismantled the terrarium. Actually, I did it. Lissie wouldn't even come into the kitchen. I am planning to try again, once I find charcoal. And tiny ferns.


I'm not really a houseplant person. I like them, I buy them, and then all but the heartiest die within a few months. I wouldn't say I have a black thumb, exactly.* It's more like a lazy thumb. But lately, I keep seeing terrariums, and I think I love them. They are supposed to be low maintenance, so I thought setting one up would be a fun project as we ease into spring.

There are no doubt a zillion better tutorials experiments out there than mine, but here you go anyway. This is what we did, and our plants survived the first night, so I'm feeling pretty good about it.

First, you need a glass container. I had this crooked cake stand a friend gave me. She thought it might be good for a Halloween party. And it would, but we haven't had a Halloween party yet and it's been sitting in the cupboard (the one we never go into, because of the mouse poop, but then one of the cats got stuck under the lazy Susan, and I saw the cake stand in there) for so long I wouldn't even have remembered to use it if we'd had a Halloween party last year.

Don't forget to wash your container really well to remove any mouse poop germs (you can skip this step if you don't have mice).


You also need small stones, soil, and moss. I added a clear drainage plate to hold everything in place because the base of the cake stand is flat. Some people recommend activated charcoal** too, but I am not exactly sure why. I read that it prevents odors, but I guess the lid should probably keep them in?*** I suppose if it starts to smell bad, I'll add some charcoal. Or just never open the lid.****


Start with a layer of stones.


Cover them with moss. This step may be optional, but the moss keeps the soil from migrating down into the stones so it won't get soggy. It seems like a good idea.


Cover the moss with soil.


Then you add plants. I didn't get a good picture of mine before they were planted, but obviously, you need plants that like high humidity and will fit inside your container. I used baby's tears (also called angel's tears), polka dot,***** and some kind of ivy. I bought the smallest plants I could find, and I did have to check a few different places to find tiny plants. I really wanted a fern, but I couldn't find any that would fit. I may add one later though.

You can sometimes separate the plants too. My polka dot container had four plants, but the roots were really tangled, so it looks like two plants. There were three ivies, but only two fit in the cake stand. It will be interesting to see how those two do vs. the one we planted in a pot.


It took some fiddling to get the plants where I liked them. Once I was done, we made sure the roots were covered with soil, and covered the soil with moss. I don't know whether that's necessary, but I think it looks nicer.


Then you add water****** and put on the lid. It only needs to be watered every few weeks (perfect for those of us with lazy thumbs), and if too much condensation builds up inside, the lid should be removed for a little while--which I guess is where the charcoal comes in handy.******* Dang.


*This is debatable.
**Definitely get the charcoal.
***It doesn't.
****Sometimes, you have to open the lid.
*****RIP Polka dot plants, we barely knew you.
******A tiny bit of water. Far less than you think you need.
*******Finally, I was right about something in this post.

Friday, February 17, 2012

Guest Post: Homespun Waldorf

I know I have been away from my blog for a long time. Things have been very hectic around here (holidays, out of town guests, launching a website, an out of town guest, Brad losing his job, more out of town guests, and then another out of town guest), and I have had to slow down a bit and focus on other things for a while.

I'm sure things will be back to normal soon, and I will be back to blogging regularly. In the meantime, check out my guest post over at Homespun Waldorf. I'm excited that I got to be a part of their Winter Carnival. Be sure to check out the other great posts too. There are quite a few recipes and crafts I am looking forward to trying out, and who knows--maybe one day I'll even find time to do a little pondering.


Saturday, December 17, 2011

Vegan Ginger Snaps


Vegan Ginger Snaps

(recipe adapted from here)

2/3 cup olive oil
1 cup sugar
1 T flax seed, ground
3 T water
4 T molasses
2 cups flour
2 t baking soda
1/2 t salt
1 1/2 t cinnamon
2 t ginger
1/3 cup coarsely granulated sugar, for dipping

1. Preheat oven to 350.
2. Mix ground flax seeds with water, and set aside.
3. Combine 1 cup of sugar, oil, and molasses, then add the flax mixture and stir until combined.
4. Sift together flour, baking soda, salt, cinnamon, and ginger.
5. Add the flour to the wet mixture, about a 1/2 cup at a time, mixing well after each addition.
6. Dip tops of rounded spoonfuls of dough in sugar and set on baking sheet, about two inches apart. Use the back of a fork to flatten slightly.
7. Bake for 8-10 minutes, and let cookies cool slightly before removing from the pan.

Makes about 24 cookies.

I find that 8-9 minutes makes a chewier cookie, while 9-10 minutes makes a crispier cookie. I prefer mine crispy, but Brad and Ariana like them chewy.

If you're not vegan, you can find the original recipe here: Olive Oil Cookies.

Monday, December 12, 2011

Small Kids, Big Color

I wasn't going to post about this here, because I just posted about the other contest, and this is hardly a home design blog--although that probably counts as homemaking too, right? And this blog is kind of about homemaking. Once in a while. But still, I wasn't going to post about the contest--except then Maxine's room made it into the finals! And I am too excited to not post about that.


Small Kids, Big Color is the annual color contest on Ohdeedoh--the kids' version of Apartment Therapy's Room for Color contest. This year, they put up 62 entries and the top nine made it into the finals. This really exciting for me, because I remember looking at, and voting on, contest entries three years ago (and every year since) and thinking how fabulous they were and wishing I had a fabulous room like that in my house. And I guess now I do. I should probably also mention that Ohdeedoh has been a huge inspiration for me. They feature so many great, and accessible, kids' rooms that there isn't enough time in the day to look at them all (at least, not for me). Even if I don't win, I feel so honored that my room got to be a part of it all, and doubly so that my room made it to the finals.

You can check out my original entry here: Maxine's Vintage Sunshine.  You may get a laugh, as I did, from all the comments saying how warm and sunny the room looks. And it is sunny, yes. But it is also an unheated sleeping porch, with three windowed walls. In Michigan. So it is definitely not warm--until June. Even so, I wouldn't exactly call it "warm" then, so much as "unbearably hot." But isn't it lovely?  We do enjoy spending lots of time in there during the winter, because of all the light.

If you'd like to vote, or just check out all of the other finalists, here is the link: Ohdeedoh Small Kids, Big Color Finalists. They're all beautiful rooms, and full of inspiration, but I've put pictures of a few of my favorites below.

Felix's Tintin Inspired Nursery
Grandmother Inspired Room
Chloe's Soiree Suite

Friday, December 2, 2011

Beeswax: A Retrospective

I know I have been very lax in school related posting lately, but rest assured, we have been doing school related activities! I think I have mentioned before that a big part of what drew me to the Waldorf teaching style is the art. One thing the girls look forward to very much is our Monday circle time when we do a little beeswax sculpture to go along with the story for that week.

I didn't plan it so each item we've made so far used a different color, but it worked out that way. Maybe because that's just how things happen sometimes, or maybe because that's just how things happen when it's always 9:45 Monday morning and you are standing in the craft room frantically trying to think of a simple clay sculpture to go with that week's story before the girls start fighting over who sits where and you lose the whole peaceful circle time vibe, and you are faced with a box of neat rectangles of clay or a plastic bag full of prior weeks' projects. At any rate, we've cycled through all the colors now, and I thought it would be fun to do a post about the things we've made before I reshape them all so they can be reused.

First were the balls moons, of course. These went along with the story "Harvest Moon Magic" by Suzanne Down.


Then, the week of the autumn equinox, we made pomegranates to go with the story of Demeter and Persephone.  


Then we read "Michaelmas Story of the Star Children" by Corinne Batzell. I printed it out from somewhere, but I can't seem to find it again. It's a great story though, and if you aren't as lazy as me, you could probably spend ten seconds Googling it. We made sprouts to go with the story. They're kind of springish, but the tube shape was a nice change from what we'd been doing.  


Next, we made leaves to go with the story "The Elder Brother" from here.  

I guess we lost a stem from one of our leaves.  I can't find the other picture I took before I threw these in a plastic bag and jumbled them around the craft bin though, so this one will have to do.
For Martinmas, we made flames. They look a lot like the sprouts, actually, except yellow. This was the Monday I forgot to get out the wax, and after the girls sat down, Max kept saying "day, day, day, no day" with a sullen look on her face. I had no idea what she was talking about until Lissie said "Oh, I know, you forgot the clay!" I find it interesting how quickly Maxine adapted to the weekly rhythm.  

Our story that week was "Saint Martin's Light" by Reg Down, who has kindly made a number of his stories available for download on his site. It's a wonderful resource and a great way to sample his work if your local library doesn't carry his books (as ours doesn't) and you are on a budget (like we are). This was actually my first introduction to his stories, but I loved everything I read, so I "liked" Tiptoes Lightly on Facebook and then won a copy of The Cricket and The Shepherd Boy in a giveaway that he did. How cool is that? Reg Down seems like a really nice guy too, which makes me want to buy all of the rest of his books immediately, but alas, that budget! We are building our collection slowly though.  


And for our last project, I thought we'd branch (hah!) out a bit from the tube shape. Lissie and I made trees (Maxine made a tree stump), which went along nicely with the story "Autumn Bear" by Suzanne Down.  


In Feingold related news, I recently learned about a product called Gloves in a Bottle which prevents things from being absorbed into the skin. I can't wait to try it out with Lissie. I am hoping it will allow her to use markers, beeswax crayons and paint again (although she has been doing well with her Artemis watercolors). I haven't decided yet if we'll try the Stockmar modeling beeswax, or stick with Artemis if the "gloves" work. Maybe we'll use a combination of both.  I do like the muted colors and variations in the kind we've been using, but I have a feeling the girls would enjoy the brighter Stockmar colors too.